In this article, we will learn how to create a drag-and-drop effect by the react-beautiful-dnd library.
We are going to build a simple to-do list with draggable items.

Steps:
Step 1: Creating a new React.js project
Step 2: Creating a list with draggable and droppable items
Step 3: Saving the order after the dragging
Let's begin and have fun.
Step 1: Creating a new React.js project
Download the repo from Github
Go to the starter folder, and install packages:
cd starter
npm install
Note: The starter folder contains pre-written CSS and code templates to save you time.
Run the app
npm startStep 2: Creating a list with draggable and droppable items
Firstly, we disable the strict mode by commenting out the React.StrictMode to ensure react-beautiful-dnd works properly.
// index.js

root.render(
  // <React.StrictMode>
    <App />
  // </React.StrictMode>
);
Now, let's work on the List component.
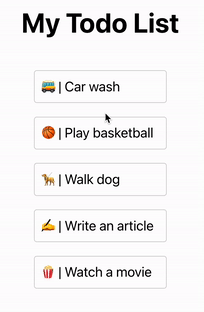
Let's create some mock data:
// List.js

export const List = () => {

  // Insert the data here ->
  const todoItems = [
    {
      id: 'car-wash',
      name: '🚌 | Car wash',
    },
    {
      id: 'basketball',
      name: '🏀 | Play basketball',
    },
    {
      id: 'dog',
      name: '🦮 | Walk dog',
    },
    {
      id: 'writing',
      name: '✍️ | Write an article',
    },
    {
      id: 'movie',
      name: '🍿 | Watch a movie',
    }
  ]

  ...
}
Create a todo list by replacing the codes in the return function:
export const List = () => {

  ...

  return (
    <ul className="characters">
      {
        todoItems.map(({id, name}, _) => (
          <li key={id}><p>{ name }</p></li>
        ))
      }
    </ul>
  )
}
Add Drag and Drop Context
DragDropContext is a wrapper that provides the ability to use the features of react-beautiful-dnd. It works like the Context API of React.js. he official document suggested wrapping the entire application in a <DragDropContext /> (Nested DragDropContext is not supported). For simplicity, we wrap the list component instead.
At the top of the file, import DragDropContext:
// List.js

import { DragDropContext } from 'react-beautiful-dnd'
Wrap the list with DragDropContext:
<DragDropContext>
  <ul className="characters">
    ...
  </ul>
</DragDropContext>
Now, we can implement the features of the library.
Make a component droppable
Making the component "droppable" allows us to move the items inside the area around.
Now, import the Droppable
import { DragDropContext, Droppable } from 'react-beautiful-dnd'
Wrap the <ul> code block with Droppable:
<Droppable droppableId='todos'>
  {(provided) => (
    <ul className="characters">
      ...
    </ul>
  )}
</Droppable>
Two things to be noticed here:
- droppableId - It is required for the library to keep track of the interactions.
- A function with provided argument - this argument includes references that we will need to pass to the url element.
Let's add attributes to the ul element:
<ul className="characters" {...provided.droppableProps} ref={provided.innerRef}>
provided.innerRef is the reference the library needs to access the elements within the wrapper.
provided.droppableProps helps the library to keep track of movements and positioning.
Make items draggable
Up to this point, the app has no interaction at all.
Now we will make the app interac†ive by making the items movable.
We do this by simply wrapping each to-do item with a Draggable component.
First, import Draggable:
import { DragDropContext, Droppable, Draggable } from 'react-beautiful-dnd'
Next, wrap each item in the loop with <Draggable/>:
{
    todoItems.map(({id, name}, _) => (
      // Add draggable wrapper here
      <Draggable>
          {
            (provided) => (
              <li key={id}>
                <p>{ name }</p>
              </li>
            )
          }
      </Draggable>
    ))
  }
It is very similary to Droppabe, where we need to include a function with provided parameter.
Beside that, we will also need to pass three additional props to <Draggable>
- key
- draggableId
- index
First, add index to map function's arguments:
todoItems.map(({id, name}, index) => (
  ...
)
Then add props:
todoItems.map(({id, name}, index) => (
  <Draggable key={id} draggableId={id} index={index}>
  ...
  </Draggable>
))
Finally, let's add innerRef, and two additional props from the provided argument:
<Draggable key={id} draggableId={id} index={index}>
  {(provided) => (
      <li ref={provided.innerRef}
            {...provided.draggableProps}
            {...provided.dragHandleProps}>
        ...
Now, we can drag the items around after refreshing the page!
However, when you open the developer console, you will see some error messages like:
Droppable setup issue [droppableId: "todos"]:DroppableProvided > placeholder could not be found.To fix that, we can simply include provided.placeholder at the bottom of the <ul>...</ul> block:
<Droppable droppableId='todos'>
   {(provided) => (
      <ul className="characters" {...provided.droppableProps} ref={provided.innerRef}>
        ...

        // place here
        {provided.placeholder}
      </ul>
   )}
</Droppable>
Step 3: Saving the order after the dragging
We can move the items around now. However, they will go back to the original order after rerendering.
To make the new order permanent, we will create a function and pass it to the onDragEnd prop of DragDropContext.
The onDragEnd prop will fire the function once a drag action is triggered.
Create a state to store items
Let's store items in a state so they can be updated between re-renderings.
Import useState:
import React, { useState } from 'react'Create a state with todoItems as the default value
const [todos, updateTodos] = useState(todoItems)Replacing todoItems with todos for the loop:
<ul className="characters" {...provided.droppableProps} ref={provided.innerRef}>
      // here ->
      {todos.map(({id, name }, index) => {
Update state after a drag action
Create a new function to handle the drag event:
const handleOnDragEnd = (result) => {
  // if item is out of bounds, then ignore
  if (!result.destination) return

  // create a new array from todos state
  const items = Array.from(todos)

  // put items in new order
  const [reorderedItem] = items.splice(result.source.index,  1)
  items.splice(result.destination.index, 0, reorderedItem)

  // update state
  updateTodos(items)
}
To learn about the details of the result parameter, you can print it with console.log(result) inside the function. Basically, the parameter contains information about the index of the item being moved and the index of the destination.
Now, let's pass the handleOnDragEnd function to onDragEnd prop:
<DragDropContext onDragEnd={handleOnDragEnd}>
Voila! Now we have a react app with a drag-and-drop feature.
Links
Demo: https://react-drag-n-drop-pi.vercel.app/
Repo: https://github.com/yuandongzhong/react-drag-and-drop
More fun stuffs you can do with the library: https://react-beautiful-dnd.netlify.app/